Migrate from Medium to Hugo
Own Your Blog, Own Your Style

Photo by Lili Popper on Unsplash
Medium has long been a favorite platform for writers, bloggers and for me, offering a user-friendly interface and an audience-ready environment. But over time, its limitations can become apparent—limited customization, paywalls, and lack of true ownership over your content. That’s where Hugo comes in, a static site generator that empowers you to create a fully customized blog with your own domain, hosted wherever you choose.
Migrating to Hugo means embracing the freedom of full control, but it’s not without its challenges. Setting up and managing your own blog might feel daunting at first, especially if you’re used to Medium’s simplicity. However, the rewards—like owning your content, endless customization options, and zero platform-imposed restrictions—make the effort worthwhile.
In the first post, we’d explore why Hugo is an excellent alternative to other Platforms.
In this post we’ll explore how you can make the transition smoothly, and what to consider as you weigh the pros and cons of this move.
Benefits of Migrating to Hugo:
- Ownership of Content: No paywalls or platform restrictions; your blog is truly yours.
- Customization: Tailor every aspect of your blog’s design to match your style and needs.
- Cost-Effective Hosting: Host your blog for free on platforms like GitHub Pages.
- Performance: Static sites are incredibly fast and SEO-friendly.
- No Ads or Platform Fees: Eliminate distractions like third-party ads and Medium’s subscription model.
Downsides to Consider:
- Learning Curve: If you’re new to Hugo or static site generators, there’s some setup required.
- No Built-in Audience: Unlike Medium, Hugo doesn’t come with an existing audience; you’ll need to drive traffic yourself.
- Content Migration Effort: Moving posts from Medium to Hugo requires some technical work, including formatting updates.
1. Deciding the Options
The Hugo website provides several options for migrating content from Medium to Hugo. While these options may work for many, they didn’t fully meet my expectations or requirements.
After experimenting with the available tools, I decided to create my own solution to streamline the migration process. But don’t worry, we’ll dive deeper into this custom tool and how it works later in the post.
2. Download Your Medium Content
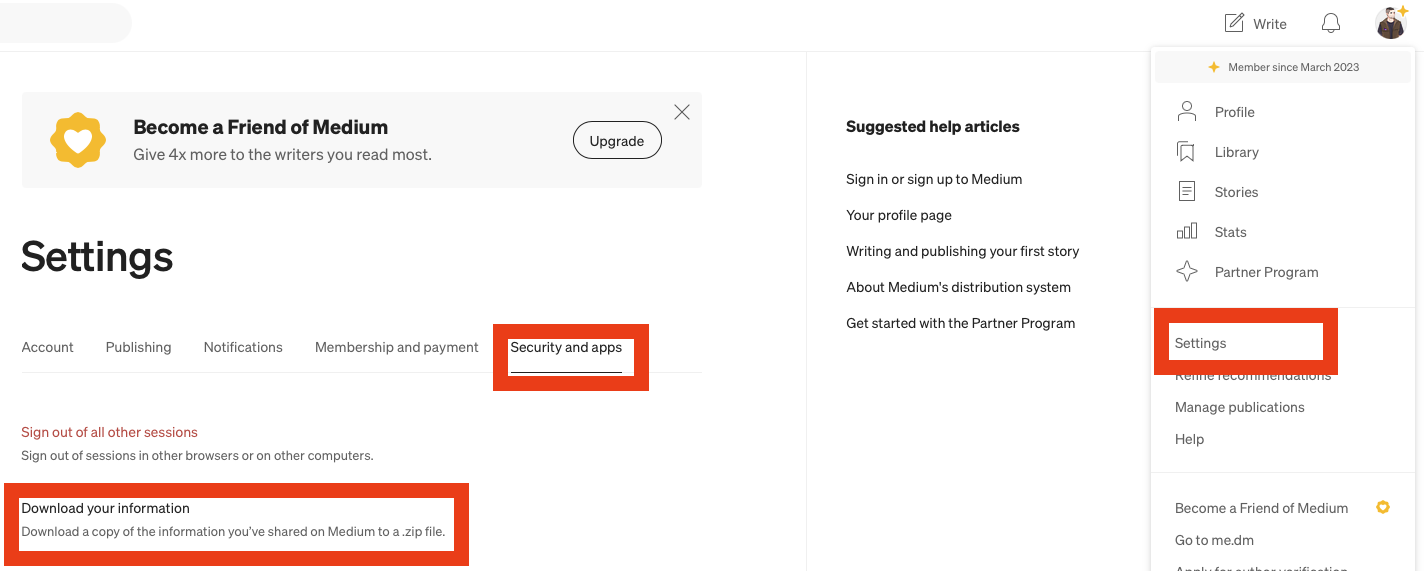
To begin the migration process, you first need to download your Medium data. Medium provides an option to do this via the Download your information feature.
- Log in to your Medium account and navigate to the Settings page.
- Locate the Download your information section and request your data.
- Medium will send you a download link via email. Click the link to retrieve a
.zipfile containing all your data, including your posts.
Once you’ve downloaded the .zip file, extract its contents. Let’s assume you saved the file to the ~/Downloads
folder. After unzipping, you’ll find a folder named something like medium-export-${LONGID}, where ${LONGID} is a
unique identifier for your export.
The extracted folder contains several files and subdirectories, including your posts, bookmarks, and other Medium data. Here’s an example of what the structure might look like:
❯ ls medium-export-${LONGID}
README.html      bookmarks        highlights       ips.html         posts            pubs-following   topics-following users-following
blocks           claps            interests        lists            profile          sessions         twitter
3. Convert your Posts with GoFromMediumToHugo
After exploring the existing tools and doing some research, I couldn’t find a tool that perfectly fit my needs. So, I decided to create my own migration tool: GoFromMediumToHugo. This tool is built using the html-to-markdown library and is designed to streamline the migration process from Medium to Hugo.
Installing the Tool
You can use the tool in multiple ways:
- Download the binary files.
- Build it yourself from the source.
- Run it directly using a Docker container.
For simplicity, this guide focuses on using the Docker container, which eliminates the need to download or build the tool manually.
Step 1: Set Up Your Working Directory
Navigate to the folder where your Medium export is located:
cd ~/Downloads/
Create a new folder to store your draft posts. While you can extract the posts directly into your Hugo content folder, it’s a good idea to review each post first (e.g., to set the correct syntax for quoted blocks). For this reason, I prefer moving them one by one:
mkdir draftedposts
Step 2: Run the Migration Tool
Use the following command to run the migration:
podman run -v $(pwd)/:/downloads ghcr.io/0hlov3/gofrommediumtohugo:latest convert \
  --posts /downloads/medium-export-${LONGID}/posts \
  --output /downloads/draftedposts \
  --type posts
This command mounts your current directory and processes your Medium posts, converting them into Hugo-compatible Markdown files.
Step 3: Check the Output
After running the command, you’ll see an output similar to this:
draftetposts
└── posts
    ├── 2021-11-01T11:45:54.729Z_POSTNAME1
    │   ├── 1.jpeg
    │   └── index.md
    ├── 2021-11-01T11:47:16.098Z_POSTNAME2
    │   ├── 1.jpeg
    │   └── index.md
Each post will be saved in a separate folder, containing its corresponding index.md file and any images used in the post.
Step 4: Move Posts to Your Hugo Content Folder
To finalize the migration, move each post folder into your Hugo content/posts directory. For example:
├── content
│   ├── Resume.md
│   └── posts
│       ├── 2021-11-01T11:45:54.729Z_POSTNAME1
│       │   ├── 1.jpeg
│       │   ├── index.md
Everything should now work as expected. If you encounter any issues, feel free to create a github issue for support.
4. Canonical Link
When migrating your posts from Medium to Hugo, it’s essential to handle the canonical link correctly to maintain search engine optimization (SEO) and avoid duplicate content issues.
What Is a Canonical Link?
A canonical link is a meta tag that tells search engines which version of a webpage is the “official” or original source. This is especially important when the same content exists on multiple platforms, like Medium and your Hugo-powered blog. By setting a canonical link, you help search engines understand which page to prioritize in search results.
When to Use a Canonical Link
If Medium should be the original Source:
If you want Medium to remain the “truth” for your older posts, you should add a canonical link on your Hugo blog pointing back to the original Medium post. This lets search engines know that Medium is the authoritative source for that content.
If Your Blog should be the original Source:
If you’re transitioning completely to Hugo and want your blog to be the primary source, you should set the canonical link on Medium to point to your new blog post URL. This ensures your blog is recognized as the definitive source moving forward.
Adding a Canonical Link in Hugo
If your theme supports canonical links, you can set one directly in the frontmatter of your post. This ensures search engines recognize your Hugo post as the original source. Add the following to your frontmatter:
canonicalURL = "https://example.com/my-original-article"
This ensures that search engines recognize your Hugo post as the original content.
Adding a Canonical Link on Medium
Medium allows you to set a canonical link when editing a post. Follow these steps:
- Open the Medium editor for the post you’ve migrated.
- Click the three dots in the top-right corner and select More Settings.
- In the Advanced Settings section, add the canonical URL of your Hugo post.
- Save the changes.
Conclusion
Migrating from Medium to Hugo might seem like a daunting task at first, but with the right tools and a clear process, it becomes a rewarding journey toward complete ownership of your content. By leveraging tools like GoFromMediumToHugo, you gain the ability to customize, optimize, and host your blog on your terms, free from platform limitations.
While the transition requires some initial effort—like setting up Hugo, reviewing migrated content, and hosting your site—the benefits far outweigh the challenges. You’ll enjoy faster load times, full control over your design and functionality, and the freedom to decide how your content is shared with your audience.
Whether you’re a blogger looking to break free from platform restrictions or a developer who values flexibility and customization, Hugo offers a powerful solution. And the best part? Hosting your blog on platforms like GitHub Pages keeps it free, reliable, and scalable.
So, what are you waiting for? Take control of your blog, unleash your creativity, and start building a platform that’s truly yours. If you encounter any roadblocks along the way, remember the Hugo and open-source communities are always there to help.
Happy blogging, and welcome to the world of static sites!
Don’t Trust Me — Seriously
The author takes no responsibility for any mishaps, broken servers, or existential crises caused by following this information.
If you spot a mistake, have a better way of doing things, or just want to chat about tech, feel free to reach out.
Also, this isn’t an ad — unless my enthusiasm and advocacy for cool stuff count as advertising.