Create Your Personal Page Today
Host It for Free on GitHub Pages!

Hi there! If you work in IT, you should consider creating a personal webpage. A personal webpage can serve as a professional portfolio, a digital business card, or even a space to share your thoughts and projects. In this article, we’ll explore static site generators, tools that make it easy to create fast, secure, and scalable websites.
There are countless static site generators to choose from, such as Jekyll, Docusaurus, Gatsby and Hugo. For simplicity and efficiency, we’ll focus on Hugo in this article.
To make things even better, we’ll use GitHub to host your website for free. Sounds exciting, right? Let’s get started!
Step 1: Create a GitHub Account
To use GitHub’s free hosting capabilities, the first step is to create a GitHub account. Head to GitHub and sign up for a new account. Verify your email address and choose an appropriate username. Once your account is set up, you’ll need to create a repository with the name <username>.github.io. For example, if your GitHub username is alice, your repository should be named alice.github.io. This naming convention is essential, as it ensures GitHub recognizes your repository as a personal website.
For enhanced security, enable two-factor authentication (2FA). 2FA requires you to enter a generated code from an authenticator app or SMS when logging in, providing an extra layer of identity verification. Using an authenticator app like Authy or Google Authenticator is more secure than SMS-based 2FA. This small step adds significant protection to your account.
If you don’t have Git installed, refer to the Git installation guide.
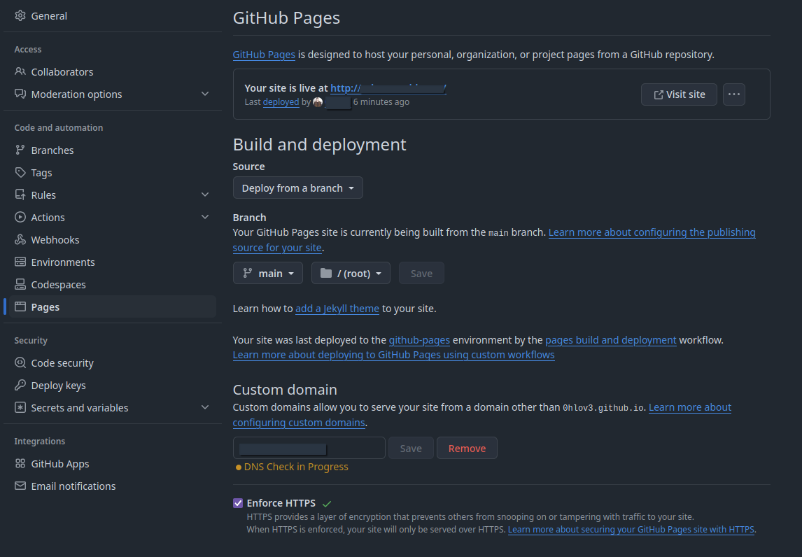
Step 2: Configure GitHub Pages
Now that you have an empty repository, let’s get your site live on the web! This is made possible by GitHub Pages.
GitHub Pages is a free static web hosting service that hosts websites directly from GitHub repositories, automatically publishing new commits live. If you create a repository with <username>;.github.io, the GitHub Pages feature should be enabled by default.
Mostly if you create a Repository with <username>.github.io the Github Pages Plugin is enabled by default.
Here’s how to configure it manually:
Go to the “Settings” tab in your repository.
Scroll down to the “GitHub Pages” section.
Set the “Source” to your repo’s
mainormasterbranch.Click “Save.”
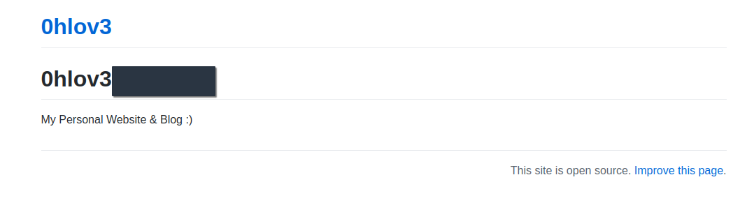
Here is an initial website created from the repository’s README.md.
It may take a few minutes for your site to be live at https://yourusername.github.io. Congratulations, you’re now hosting on GitHub Pages!
Step 3: Clone Your Repository
To add content and make changes, you need to clone your repository onto your local machine. Use the following command in your terminal:
git clone https://github.com/<username>/<username>.github.io
Step 4: Install Hugo
Before creating your site, install Hugo on your machine. Hugo is a lightweight and fast static site generator. Follow the Hugo installation guide for your operating system to get it up and running.
Step 5: Create a Hugo Site
With Hugo installed, navigate to the directory cd <username>.github.io where you cloned your repository and run:
hugo new site .
If your repository wasn’t initialized empty, use:
hugo new site . --force
Hugo will create a standard directory structure for your site’s content, themes, and configuration.
Step 6: Add Site Content
Your website is now set up, but it’s empty. Let’s add some content! Start by creating an index.html file or use Hugo’s markdown-based content system. To create a new post, run:
hugo new posts/my-first-post.md
Open the file and write your content in Markdown format.
Step 7: Choose a Theme
Hugo supports a variety of themes to style your site. Visit the Hugo Themes page to find one you like. Alternatively, you can create your own theme if you prefer something more customized. Download and apply your chosen theme by following the theme’s installation instructions.
In my case, I’ve opted to use a theme I’ve created myself, called hugo-profolio. It’s still a work in progress, and I’m actively looking for feedback and help to improve its design, colors, and documentation. If you’re interested in contributing or sharing ideas, I’d love to hear from you!
To add my custom theme to your project, use the following command:
git submodule add --depth=1 git@github.com:0hlov3/hugo-theme-hugoprofolio.git themes/hugo-profolio
Once added, configure your theme in the hugo.toml file. Here’s an example configuration:
# If you don’t have an external domain applied
baseURL = 'https://<username>.github.io/'
languageCode = 'en-us'
title = 'My New Blog'
theme = "hugo-profolio"
Most themes come with detailed documentation about customization options. However, since my theme is still evolving, some features and settings may not be fully documented yet. Feel free to experiment and share your feedback, your input can help make it better!
Step 8: Preview your site
To preview your site locally, run:
hugo server
Visit http://localhost:1313 in your browser to view your site.
Step 9: Deploy to GitHub Pages
Option 1: Deploy Manually
To deploy your site, push the generated files to your GitHub repository. First, ensure your site’s static files are in the public directory. Then, commit and push them:
hugo
git add .
git commit -m "Initial commit"
git push origin main
Your site will be live at https://yourusername.github.io shortly after pushing.
Option 2: Deploy with GitHub Actions
Automate your deployments using a GitHub Actions workflow. Create a file at .github/workflows/hugo.yaml with the following content:
mkdir -p .github/workflows
touch .github/workflows/hugo.yaml
vim .github/workflows/hugo.yaml
.github/workflows/hugo.yaml
# Sample workflow for building and deploying a Hugo site to GitHub Pages
name: Deploy Hugo site to Pages

on:
  # Runs on pushes targeting the default branch
  push:
    branches:
      - main

  # Allows you to run this workflow manually from the Actions tab
  workflow_dispatch:

# Sets permissions of the GITHUB_TOKEN to allow deployment to GitHub Pages
permissions:
  contents: read
  pages: write
  id-token: write

# Allow only one concurrent deployment, skipping runs queued between the run in-progress and latest queued.
# However, do NOT cancel in-progress runs as we want to allow these production deployments to complete.
concurrency:
  group: "pages"
  cancel-in-progress: false

# Default to bash
defaults:
  run:
    shell: bash

jobs:
  # Build job
  build:
    runs-on: ubuntu-latest
    env:
      HUGO_VERSION: 0.141.0
    steps:
      - name: Install Hugo CLI
        run: |
          wget -O ${{ runner.temp }}/hugo.deb https://github.com/gohugoio/hugo/releases/download/v${HUGO_VERSION}/hugo_extended_${HUGO_VERSION}_linux-amd64.deb \
          && sudo dpkg -i ${{ runner.temp }}/hugo.deb
      - name: Checkout
        uses: actions/checkout@v4
        with:
          submodules: recursive
          fetch-depth: 0
      - name: Setup Pages
        id: pages
        uses: actions/configure-pages@v5
      - name: Install Node.js dependencies
        run: "[[ -f package-lock.json || -f npm-shrinkwrap.json ]] && npm ci || true"
      - name: Build with Hugo
        env:
          HUGO_CACHEDIR: ${{ runner.temp }}/hugo_cache
          HUGO_ENVIRONMENT: production
          TZ: America/Los_Angeles
        run: |
          hugo \
            --gc \
            --minify \
            --baseURL "${{ steps.pages.outputs.base_url }}/"
      - name: Upload artifact
        uses: actions/upload-pages-artifact@v3
        with:
          path: ./public

  # Deployment job
  deploy:
    environment:
      name: github-pages
      url: ${{ steps.deployment.outputs.page_url }}
    runs-on: ubuntu-latest
    needs: build
    steps:
      - name: Deploy to GitHub Pages
        id: deployment
        uses: actions/deploy-pages@v4
everything in place, we can commit and push
git add .
git commit -m "Initial commit"
git push origin main
From GitHub’s main menu, choose Actions. You will see something like this:

After that, revisit your site at <username>.[github.io](<http://github.io>) and hopefully you will see the new site.
Step 10: Start Writing
Your personal webpage is now live and ready to grow. Start adding more content, sharing your projects, and customizing the site to reflect your personality and skills.
Conclusion
Hugo is an excellent choice for creating a fast, efficient, and customizable personal webpage. By leveraging Hugo’s simplicity and GitHub Pages’ free hosting, you can quickly build a professional online presence that’s easy to maintain and update. Whether you use a pre-built theme or create your own, the possibilities for customization are endless.
A personal webpage not only showcases your technical skills but also serves as a hub for your projects and ideas. It’s a powerful tool to enhance your visibility in the IT industry, connect with like-minded professionals, and demonstrate your ability to deliver polished, well-organized work.
So why wait? Start building your webpage today, and let it grow alongside your career. If you encounter any issues or have suggestions for improvement, don’t hesitate to reach out. Collaboration and feedback can make the process even more rewarding.
Helpful Links:
- https://gohugo.io/hosting-and-deployment/hosting-on-github/
- https://gohugo.io/installation/](
- https://pages.github.com/
- https://docs.github.com/en/actions/about-github-actions/understanding-github-actions
Don’t Trust Me — Seriously
The author takes no responsibility for any mishaps, broken servers, or existential crises caused by following this information.
If you spot a mistake, have a better way of doing things, or just want to chat about tech, feel free to reach out.
Also, this isn’t an ad — unless my enthusiasm and advocacy for cool stuff count as advertising.